


07_SpringBoot_Web开发_配置嵌入式Servlet容器
SpringBoot默认使用容器
SpringBoot默认使用的是嵌入式的Servelt(Tomcat);
提出疑问
如何定制和修改Servlet容器的相关配置
如何定制和修改Servlet容器的相关配置;
-
修改和server有关的配置即可(ServerProperties文件定义)
server.servlet.context-path=/tomxwd server.port=8080 server.tomcat.uri-encoding=UTF-8 # 通用的Servlet容器设置 server.xxx # Tomcat的设置 server.tomcat.xxx -
编写一个EmbeddedServletContainerCustomizer(SpringBoot2.x版本为WebServerFactoryCustomizer替代):嵌入式的Servlet容器的定制器,来修改Servlet容器的配置。
@Bean
public WebServerFactoryCustomizer<ConfigurableWebServerFactory> webServerFactoryCustomizer(){
    return new WebServerFactoryCustomizer<ConfigurableWebServerFactory>() {

        // 定制嵌入式的Servlet容器相关规则
        @Override
        public void customize(ConfigurableWebServerFactory factory) {
            factory.setPort(8888);
        }
    };
}
这里是2.x版本的,1.x版本的是注入EmbeddedServletContainerCustomizer,且没有泛型,直接使用container.setPort()即可。
在1.x中ServerProperties是直接实现了EmbeddedServletContainerCustomizer,所以二者走的底层是一样的。
在SpringBoot中会有很多XxxCustomizer帮助我们进行定制配置。
如何注册Servlet、Filter、Listener三大组件
如何注册Servlet、Filter、Listener三大组件,以往Web项目中会有/webapp/WEB-INF/web.xml提供注册,现在用嵌入式的Servlet如何进行注册。
由于SpringBoot默认是以jar包的方式启动嵌入式的Servlet容器来启动SpringBoot的Web应用,没有web.xml文件。所以注册三大组件用以下的方式。
ServletRegistrationBean
编写Servlet
public class MyServlet extends HttpServlet {

    // 处理get请求
    @Override
    protected void doGet(HttpServletRequest req, HttpServletResponse resp) throws ServletException, IOException {
        doPost(req,resp);
    }

    // 处理post请求
    @Override
    protected void doPost(HttpServletRequest req, HttpServletResponse resp) throws ServletException, IOException {
        resp.getWriter().write("Hello MyServlet");
    }
}
注册到Spring容器中:
// 注册三大组件
// 1. Servlet
@Bean
public ServletRegistrationBean<MyServlet> myServlet(){
    ServletRegistrationBean<MyServlet> servletServletRegistrationBean = new ServletRegistrationBean<>(new MyServlet(),"/myServlet");
    servletServletRegistrationBean.setLoadOnStartup(1);
    return servletServletRegistrationBean;
}
最后通过访问/myServlet可以看到页面输出“Hello MyServlet”证明已成功注册。
FilterRegistrationBean
编写Filter:
public class MyFilter implements Filter {

    @Override
    public void doFilter(ServletRequest servletRequest, ServletResponse servletResponse, FilterChain filterChain) throws IOException, ServletException {
        System.out.println("MyFilter process...");
        filterChain.doFilter(servletRequest,servletResponse);
    }

    @Override
    public void init(FilterConfig filterConfig) throws ServletException {
        System.out.println("MyFilter初始化");
    }

    @Override
    public void destroy() {
        System.out.println("MyFilter销毁");
    }
}
注册到Spring容器中:
// 2. Filter
@Bean
public FilterRegistrationBean<MyFilter> filterFilterRegistrationBean(){
    FilterRegistrationBean<MyFilter> registrationBean = new FilterRegistrationBean<>(new MyFilter());
    registrationBean.setUrlPatterns(Arrays.asList("/hello","/myServlet"));
    return registrationBean;
}
在访问/hello,/myServlet的时候回进行过滤操作,输出MyFilter process...。
ServletListenerRegistrationBean
编写Listener:
public class MyListener implements ServletContextListener {
    @Override
    public void contextInitialized(ServletContextEvent sce) {
        System.out.println("contextInitialized...web应用启动");
    }

    @Override
    public void contextDestroyed(ServletContextEvent sce) {
        System.out.println("contextDestroyed...当前web应用销毁");
    }
}
注册到Spring容器中:
// 3. Listener
@Bean
public ServletListenerRegistrationBean<MyListener> servletListenerRegistrationBean(){
    ServletListenerRegistrationBean<MyListener> listenerRegistrationBean = new ServletListenerRegistrationBean<>();
    listenerRegistrationBean.setListener(new MyListener());
    return listenerRegistrationBean;
}
观察控制台,在项目启动的时候,会输出contextInitialized...web应用启动;正常退出项目(Exit)的时候,会输出contextDestroyed...当前web应用销毁;
举例说明
最好的例子是SpringBoot在帮我们自动配置SpringMVC的时候,自动注册了SpringMVC的前端控制器(DispatcherServlet);
@Bean(name = {"dispatcherServletRegistration"})
@ConditionalOnBean(
    value = {DispatcherServlet.class},
    name = {"dispatcherServlet"}
)
public DispatcherServletRegistrationBean dispatcherServletRegistration(DispatcherServlet dispatcherServlet) {
    // 默认拦截为/,包括了静态资源,但是不拦截jps请求; /*会拦截jsp
    // 可以通过修改spring.mvc.servlet.path=来修改默认拦截的路径,SpringBoot1.x版本为server.servletPath来修改前端控制器默认拦截的请求路径
    DispatcherServletRegistrationBean registration = new DispatcherServletRegistrationBean(dispatcherServlet, this.webMvcProperties.getServlet().getPath());
    registration.setName("dispatcherServlet");
    registration.setLoadOnStartup(this.webMvcProperties.getServlet().getLoadOnStartup());
    if (this.multipartConfig != null) {
        registration.setMultipartConfig(this.multipartConfig);
    }

    return registration;
}
SpringBoot能不能支持其他的Servlet容器
查看SpringBoot默认可支持的几个Servlet容器;
-
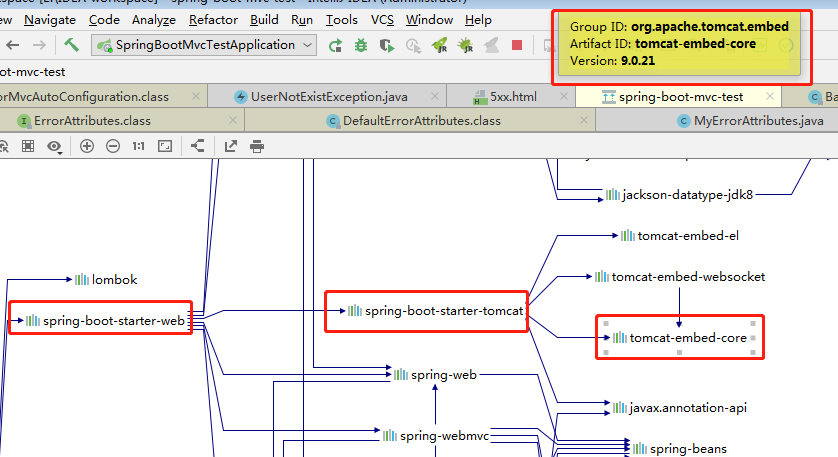
Tomcat(默认使用)
<dependency>
    <groupId>org.springframework.boot</groupId>
    <artifactId>spring-boot-starter-web</artifactId>
</dependency>
引入Web模块的时候默认就是使用嵌入式Tomcat作为Servlet容器的。
-
Jetty(长连接)
-
UnderTow(不支持JSP)
切换其他容器
想要切换就两个步骤:
-
排除tomcat的start依赖
<dependency> <groupId>org.springframework.boot</groupId> <artifactId>spring-boot-starter-web</artifactId> <exclusions> <exclusion> <artifactId>spring-boot-starter-tomcat</artifactId> <groupId>org.springframework.boot</groupId> </exclusion> </exclusions> </dependency> -
引入其他容器的starter
-
切换为Jetty:
<!-- 引入其他的Servlet容器 --> <!-- Jetty --> <dependency> <groupId>org.springframework.boot</groupId> <artifactId>spring-boot-starter-jetty</artifactId> </dependency> -
切换为UnderTow
<dependency>
    <groupId>org.springframework.boot</groupId>
    <artifactId>spring-boot-starter-undertow</artifactId>
</dependency>
-
嵌入式Servlet容器自动配置原理
SpringBoot1.x版本
SpringBoot1.x看EmbeddedServletContainerAutoConfiguration类;
-
EmbeddedServletContainerAutoConfiguration:
@AutoConfigureOrder(-2147483648) @Configuration @ConditionalOnWebApplication @Import({EmbeddedServletContainerAutoConfiguration.BeanPostProcessorsRegistrar.class}) // 导入BeanPostProcessorsRegistrar,给容器中导入一些组件 // 导入了EmbeddedServletContainerCustomizerBeanPostProcessor:后置处理器:bean初始化前后(创建完对象,还没属性赋值)执行初始化工作 public class EmbeddedServletContainerAutoConfiguration { @Configuration @ConditionalOnClass({Servlet.class, Tomcat.class})//判断当前是否引入了tomcat依赖 @ConditionalOnMissingBean( value = {EmbeddedServletContainerFactory.class}, search = SearchStrategy.CURRENT )//这个类会先判断是否有用户自定义的EmbeddedServletContainerFactory:嵌入式的Servlet容器工厂:作用是创建嵌入式的Servlet容器。 public static class EmbeddedTomcat { public EmbeddedTomcat() { } @Bean public TomcatEmbeddedServletContainerFactory tomcatEmbeddedServletContainerFactory() { return new TomcatEmbeddedServletContainerFactory(); } } -
EmbeddedServletContainerFactory(嵌入式Servlet容器工厂):
public interface EmbeddedServletContainerFactory{
    // 获取嵌入式的Servlet容器
    EmbeddedServletContainer getEmbeddedServletContainer(ServletContextInitalizer...initalizers)
}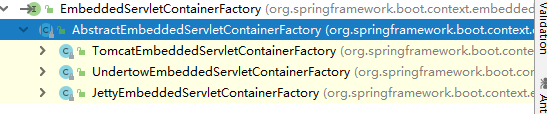
-
EmbeddedServletContainer(嵌入式的Servlet容器)

以嵌入式的Tomcat容器工厂(TomcatEmbeddedServletContainerFactory)为例
@Override
public EmbeddedServletContainer getEmbeddedServletContainer(
      ServletContextInitializer... initializers) {
    // 创建一个Tomcat
   Tomcat tomcat = new Tomcat();

    // 配置Tomcat的基本环境
   File baseDir = (this.baseDirectory != null) ? this.baseDirectory
         : createTempDir("tomcat");
   tomcat.setBaseDir(baseDir.getAbsolutePath());
    // 连接器
   Connector connector = new Connector(this.protocol);
   tomcat.getService().addConnector(connector);
   customizeConnector(connector);
   tomcat.setConnector(connector);
   tomcat.getHost().setAutoDeploy(false);
    // 引擎
   configureEngine(tomcat.getEngine());
   for (Connector additionalConnector : this.additionalTomcatConnectors) {
      tomcat.getService().addConnector(additionalConnector);
   }
   prepareContext(tomcat.getHost(), initializers);

    // 将配置好的Tomcat传入进去,返回一个EmbeddedServletContainer嵌入式的Servlet容器;并且启动Tomcat容器
   return getTomcatEmbeddedServletContainer(tomcat);
}
我们对嵌入式容器的配置修改是怎么生效的?
- 修改ServerProperties里的东西
- EmbeddedServletContainerCustomizer嵌入式Servlet容器的定制器
EmbeddedServletContainerCustomizer:定制器帮我们修改了Servlet容器的配置,原理如下:
容器中也导入了EmbeddedServletContainerCustomizerBeanPostProcessor:
// 初始化之前
@Override
public Object postProcessBeforeInitialization(Object bean, String beanName)
      throws BeansException {
    // 如果当前初始化的是ConfigurableEmbeddedServletContainer这个类型的组件,就调用初始化方法
   if (bean instanceof ConfigurableEmbeddedServletContainer) {
      postProcessBeforeInitialization((ConfigurableEmbeddedServletContainer) bean);
   }
   return bean;
}

private void postProcessBeforeInitialization(
    ConfigurableEmbeddedServletContainer bean) {
    // 获取所有的定制器,调用每一个定制器的customize方法来给Servlet容器进行属性赋值
    for (EmbeddedServletContainerCustomizer customizer : getCustomizers()) {
        customizer.customize(bean);
    }
}

private Collection<EmbeddedServletContainerCustomizer> getCustomizers() {
    if (this.customizers == null) {
        // Look up does not include the parent context
        // 只有一个核心:从容器中获取所有这个类型的组件:EmbeddedServletContainerCustomizer
        // 得到结论:想要定制Servlet容器,给容器中添加一个EmbeddedServletContainerCustomizer类型的组件,而ServerProperties也是这个组件类型。
        this.customizers = new ArrayList<EmbeddedServletContainerCustomizer>(
            this.beanFactory
            .getBeansOfType(EmbeddedServletContainerCustomizer.class,
                            false, false)
            .values());
        Collections.sort(this.customizers, AnnotationAwareOrderComparator.INSTANCE);
        this.customizers = Collections.unmodifiableList(this.customizers);
    }
    return this.customizers;
}
嵌入式容器生效步骤
-
SpringBoot根据导入的依赖情况,给容器中添加相应的
EmbeddedServletContainerFactory如【TomcatEmbeddedServletContainerFactory】 -
容器中某个组件要创建对象就会惊动后置处理器(
EmbeddedServletContainerCustomizerBeanPostProcessor)进行工作;只要是嵌入式的Servlet容器工厂,后置处理器就工作。
-
后置处理器就会从容器中获取所有的
EmbeddedServletContainerCustomizer调用定制器的定制方法
SpringBoot2.x版本
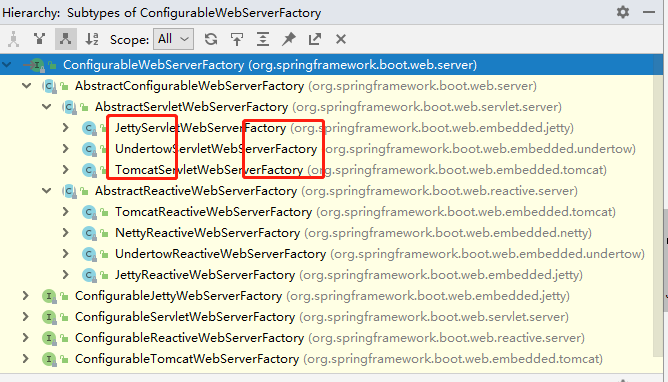
SpringBoot2.x看EmbeddedWebServerFactoryCustomizerAutoConfiguration类;
EmbeddedWebServerFactoryCustomizerAutoConfiguration:嵌入式的Servlet容器自动配置:
@Configuration
@ConditionalOnWebApplication
@EnableConfigurationProperties({ServerProperties.class})
public class EmbeddedWebServerFactoryCustomizerAutoConfiguration {
    public EmbeddedWebServerFactoryCustomizerAutoConfiguration() {
    }

    @Configuration
    @ConditionalOnClass({HttpServer.class})
    public static class NettyWebServerFactoryCustomizerConfiguration {
        public NettyWebServerFactoryCustomizerConfiguration() {
        }

        @Bean
        public NettyWebServerFactoryCustomizer nettyWebServerFactoryCustomizer(Environment environment, ServerProperties serverProperties) {
            return new NettyWebServerFactoryCustomizer(environment, serverProperties);
        }
    }

    @Configuration
    @ConditionalOnClass({Undertow.class, SslClientAuthMode.class})// 判断当前是否引入了Undertow依赖
    public static class UndertowWebServerFactoryCustomizerConfiguration {
        public UndertowWebServerFactoryCustomizerConfiguration() {
        }

        @Bean
        public UndertowWebServerFactoryCustomizer undertowWebServerFactoryCustomizer(Environment environment, ServerProperties serverProperties) {
            return new UndertowWebServerFactoryCustomizer(environment, serverProperties);
        }
    }

    @Configuration
    @ConditionalOnClass({Server.class, Loader.class, WebAppContext.class})// 判断当前是否引入了jetty依赖
    public static class JettyWebServerFactoryCustomizerConfiguration {
        public JettyWebServerFactoryCustomizerConfiguration() {
        }

        @Bean
        public JettyWebServerFactoryCustomizer jettyWebServerFactoryCustomizer(Environment environment, ServerProperties serverProperties) {
            return new JettyWebServerFactoryCustomizer(environment, serverProperties);
        }
    }

    @Configuration
    @ConditionalOnClass({Tomcat.class, UpgradeProtocol.class})//判断当前是否引入了tomcat依赖
    public static class TomcatWebServerFactoryCustomizerConfiguration {
        public TomcatWebServerFactoryCustomizerConfiguration() {
        }

        @Bean
        public TomcatWebServerFactoryCustomizer tomcatWebServerFactoryCustomizer(Environment environment, ServerProperties serverProperties) {
            return new TomcatWebServerFactoryCustomizer(environment, serverProperties);
        }
    }
}
未进行探究(待续!)
嵌入式Servlet容器启动原理
什么时候创建嵌入式的Servlet容器工厂,什么时候获取嵌入式Servlet容器并启动Tomcat;
获取嵌入式的Servlet容器工厂:
-
SpringBoot应用启动运行run方法
-
refreshContext(context):SpringBoot刷新ioc容器【创建ioc容器对象,并初始化容器,创建容器中的每一个组件】;如果是Web应用创建AnnotationConfigEmbeddedWebApplicationContext否则创建AnnotationConfigApplicationContext; -
refresh(context):刷新刚才创建好的ioc容器;@Override public void refresh() throws BeansException, IllegalStateException { synchronized (this.startupShutdownMonitor) { // Prepare this context for refreshing. prepareRefresh(); // Tell the subclass to refresh the internal bean factory. ConfigurableListableBeanFactory beanFactory = obtainFreshBeanFactory(); // Prepare the bean factory for use in this context. prepareBeanFactory(beanFactory); try { // Allows post-processing of the bean factory in context subclasses. postProcessBeanFactory(beanFactory); // Invoke factory processors registered as beans in the context. invokeBeanFactoryPostProcessors(beanFactory); // Register bean processors that intercept bean creation. registerBeanPostProcessors(beanFactory); // Initialize message source for this context. initMessageSource(); // Initialize event multicaster for this context. initApplicationEventMulticaster(); // Initialize other special beans in specific context subclasses. onRefresh(); // Check for listener beans and register them. registerListeners(); // Instantiate all remaining (non-lazy-init) singletons. finishBeanFactoryInitialization(beanFactory); // Last step: publish corresponding event. finishRefresh(); } catch (BeansException ex) { if (logger.isWarnEnabled()) { logger.warn("Exception encountered during context initialization - " + "cancelling refresh attempt: " + ex); } // Destroy already created singletons to avoid dangling resources. destroyBeans(); // Reset 'active' flag. cancelRefresh(ex); // Propagate exception to caller. throw ex; } finally { // Reset common introspection caches in Spring's core, since we // might not ever need metadata for singleton beans anymore... resetCommonCaches(); } } } -
在
onRefresh();的时候,Web的ioc容器(EmbeddedWebApplicationContext)重写了onRefresh方法@Override protected void onRefresh() { super.onRefresh(); try { createEmbeddedServletContainer(); } catch (Throwable ex) { throw new ApplicationContextException("Unable to start embedded container", ex); } } -
Web的ioc容器会创建嵌入式的Servlet容器:**createEmbeddedServletContainer();**方法;
private void createEmbeddedServletContainer() { EmbeddedServletContainer localContainer = this.embeddedServletContainer; ServletContext localServletContext = getServletContext(); if (localContainer == null && localServletContext == null) { EmbeddedServletContainerFactory containerFactory = getEmbeddedServletContainerFactory(); this.embeddedServletContainer = containerFactory .getEmbeddedServletContainer(getSelfInitializer()); } else if (localServletContext != null) { try { getSelfInitializer().onStartup(localServletContext); } catch (ServletException ex) { throw new ApplicationContextException("Cannot initialize servlet context", ex); } } initPropertySources(); } -
获取嵌入式的Servlet容器工厂:
EmbeddedServletContainerFactory containerFactory = getEmbeddedServletContainerFactory();在ioc中获取:
String[] beanNames = getBeanFactory()
      .getBeanNamesForType(EmbeddedServletContainerFactory.class);
从ioc容器中获取EmbeddedServletContainerFactory【嵌入式Servlet容器工厂】组件,如【TomcatEmbeddedServletContainerFactory】创建对象,后置处理器一看是这个对象,就获取所有的定制器来先定制Servlet容器的相关配置;
-
使用容器工厂获取嵌入式的Servlet容器:
this.embeddedServletContainer = containerFactory .getEmbeddedServletContainer(getSelfInitializer()); -
嵌入式的Servlet容器创建对象并启动Servlet容器;【tomcat启动(this.tomcat.start())】
先启动嵌入式的Servlet容器,再将ioc容器中剩下没有创建出来的对象获取出来;
-
***总结:***ioc容器启动创建嵌入式的Servlet容器
使用外置的Servlet容器
-
嵌入式Servlet容器:
应用打成可执行的jar包;
**优点:**简单、便捷
**缺点:**默认不支持JSP、优化定制比较复杂(使用定制器【ServerProperties】、【自定义EmbeddedServletContainerCustomizer】、【自己编写嵌入式Servlet容器的创建工厂EmbeddedServletContainerFactory】);
-
外置的Servlet容器:
外面安装Tomcat----应用war包的方式打包;
建项目的时候选择war包形式,然后要用tomcat来启动,注意版本搭配。
步骤:
-
创建一个war项目(利用idea创建好目录结构)
-
将嵌入式的tomcat指定为provided
<dependency> <groupId>org.springframework.boot</groupId> <artifactId>spring-boot-starter-tomcat</artifactId> <scope>provided</scope> </dependency> -
必须编写一个SpringBootServletInitializer的子类,并调用configure方法
public class ServletInitializer extends SpringBootServletInitializer { @Override protected SpringApplicationBuilder configure(SpringApplicationBuilder application) { // 传入SpringBoot应用的主程序 return application.sources(SpringBootMvcWarApplication.class); } } -
启动服务器即可。
-
外置Servlet启动原理
原理:
jar包:执行SpringBoot主类的main方法,启动ioc容器,创建嵌入式的Servlet容器;
war包:启动服务器,然后服务器启动SpringBoot应用【SpringBootServletInitializer】,启动ioc容器;
servlet3.0规范:
规则:
- 服务器启动(web应用启动)会创建当前web应用里面的每一个jar包里面的ServletContainerInitalizer的实例
- ServletContainerInitalizer的实现放在jar包的META-INF/services文件夹下,有一个名为javax.servlet.ServletContainerInitializer的文件,内容就是ServletContainerInitalizer的实现类的全类名。
- 还可以使用**@HandlesTypes**注解,在应用启动的时候加载我们感兴趣的类。
流程:
-
启动Tomcat
-
org\springframework\spring-web\5.1.8.RELEASE\spring-web-5.1.8.RELEASE.jar!\META-INF\services\javax.servlet.ServletContainerInitializer:
Spring的web模块里面有这个文件,内容就是
org.springframework.web.SpringServletContainerInitializer说明在应用启动的时候要启动他 -
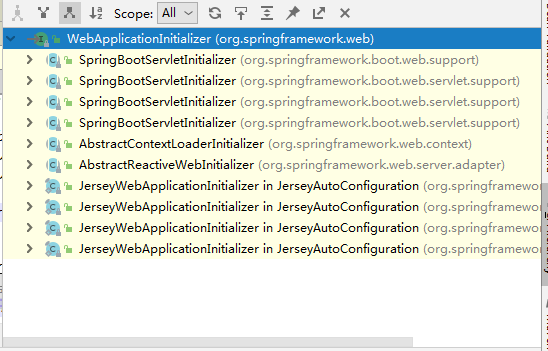
SpringServletContainerInitializer将@HandlesTypes(WebApplicationInitializer.class)标注的所有这个类型的类都传入到onStartup方法的Set<Class<?>>;为这些(WebApplicationInitializer)类型的类创建实例;
-
每一个WebApplicationInitializer都调用自己的onStartup方法。
-
相当于我们的SpringBootServletInitalizer的类会被创建对象,并执行onStartup方法
-
SpringBootServletInitalizer实例执行onStartup的时候会createRootApplicationContext;创建容器
protected WebApplicationContext createRootApplicationContext(ServletContext servletContext) { // 1、 创建SpringApplicationBuilder(spring应用的构建器) SpringApplicationBuilder builder = this.createSpringApplicationBuilder(); builder.main(this.getClass()); ApplicationContext parent = this.getExistingRootWebApplicationContext(servletContext); if (parent != null) { this.logger.info("Root context already created (using as parent)."); servletContext.setAttribute(WebApplicationContext.ROOT_WEB_APPLICATION_CONTEXT_ATTRIBUTE, (Object)null); builder.initializers(new ApplicationContextInitializer[]{new ParentContextApplicationContextInitializer(parent)}); } builder.initializers(new ApplicationContextInitializer[]{new ServletContextApplicationContextInitializer(servletContext)}); builder.contextClass(AnnotationConfigServletWebServerApplicationContext.class); // 2、 调用configure方法,子类重写了这个方法,将SpringBoot的主程序类传进来。 builder = this.configure(builder); builder.listeners(new ApplicationListener[]{new SpringBootServletInitializer.WebEnvironmentPropertySourceInitializer(servletContext)}); // 3、 使用builder创建一个Spring应用 SpringApplication application = builder.build(); if (application.getAllSources().isEmpty() && AnnotationUtils.findAnnotation(this.getClass(), Configuration.class) != null) { application.addPrimarySources(Collections.singleton(this.getClass())); } Assert.state(!application.getAllSources().isEmpty(), "No SpringApplication sources have been defined. Either override the configure method or add an @Configuration annotation"); if (this.registerErrorPageFilter) { application.addPrimarySources(Collections.singleton(ErrorPageFilterConfiguration.class)); } // 4、 启动Spring return this.run(application); } -
Spring的应用就启动并创建IOC容器。
public ConfigurableApplicationContext run(String... args) {
    StopWatch stopWatch = new StopWatch();
    stopWatch.start();
    ConfigurableApplicationContext context = null;
    Collection<SpringBootExceptionReporter> exceptionReporters = new ArrayList();
    this.configureHeadlessProperty();
    SpringApplicationRunListeners listeners = this.getRunListeners(args);
    listeners.starting();

    Collection exceptionReporters;
    try {
        ApplicationArguments applicationArguments = new DefaultApplicationArguments(args);
        ConfigurableEnvironment environment = this.prepareEnvironment(listeners, applicationArguments);
        this.configureIgnoreBeanInfo(environment);
        Banner printedBanner = this.printBanner(environment);
        context = this.createApplicationContext();
        exceptionReporters = this.getSpringFactoriesInstances(SpringBootExceptionReporter.class, new Class[]{ConfigurableApplicationContext.class}, context);
        this.prepareContext(context, environment, listeners, applicationArguments, printedBanner);
        // 刷新IOC容器
        this.refreshContext(context);
        this.afterRefresh(context, applicationArguments);
        stopWatch.stop();
        if (this.logStartupInfo) {
            (new StartupInfoLogger(this.mainApplicationClass)).logStarted(this.getApplicationLog(), stopWatch);
        }

        listeners.started(context);
        this.callRunners(context, applicationArguments);
    } catch (Throwable var10) {
        this.handleRunFailure(context, var10, exceptionReporters, listeners);
        throw new IllegalStateException(var10);
    }

    try {
        listeners.running(context);
        return context;
    } catch (Throwable var9) {
        this.handleRunFailure(context, var9, exceptionReporters, (SpringApplicationRunListeners)null);
        throw new IllegalStateException(var9);
    }
}
总结启动原理:
- Servlet3.0标准ServletContainerInitializer扫描的所有jar包中的META-INF/services/javax.servlet.ServletContainerInitializer文件指定的类并加载这个类
- 加载spring web包下的SpringServletContainerInitializer
- 扫描@HandleType(WebApplicationInitializer)
- 加载SpringBootServletInitializer并运行onStartup方法
- 加载@SpringBootApplication主类,启动容器等。
总的来说就是先启动Servlet容器,再启动SpringBoot应用。
评论区