


03_Netty_NIO编程
Java NIO 基本介绍
- Java NIO 全称java non-blocking IO,是指JDK提供的新API。从JDK1.4开始,Java提供了一系列改进的输入/输出的新特性,被统称为NIO(即New IO),是同步非阻塞的;
- NIO相关类都被放在java.nio包及其子包下,并且对原java.io包中的很多类进行改写。
- NIO有三大核心部分:
- Channel:通道
- Buffer:缓冲区
- Selector:选择器
- NIO是面向缓冲区,或者面向块编程的。数据读取到一个它稍后处理的缓冲区,需要时可以在缓冲区中前后移动,这就增加了处理过程中的灵活性,使用它可以提供非阻塞式的高伸缩性网络;
- Java NIO的非阻塞模式,使一个线程从某个通道发送请求或者读取数据,但是它仅能得到目前可用的数据,如果目前没有数据可用的时候,就什么都不会获取,而不是保持线程阻塞,所以直到数据变得可以读取之前,该线程可以继续做其他的事情。非阻塞写也是如此,一个线程请求写入一些数据到某个通道,但不需要等待它完全写入,这个线程同时可以去做别的事情;
- 通俗理解:NIO是可以做到用一个线程来处理多个操作的。假设有10000个请求过来,根据实际情况,可以分配50或者100个线程来处理,不像之前的阻塞IO那样,非得分配10000个线程来做处理;
- HTTP2.0使用了多路复用的技术,做到同一个连接并发处理多个请求,而且并发请求的数量比HTTP1.1大了好几个数量级;
NIO Buffer的基本使用
public class BasicBuffer {

    public static void main(String[] args) {
        // 举例说明Buffer的使用
        // 创建一个Buffer,大小为5,即可以存放5个int
        IntBuffer intBuffer = IntBuffer.allocate(5);

        // 向Buffer中存放数据
//        intBuffer.put(10);
//        intBuffer.put(11);
//        intBuffer.put(12);
//        intBuffer.put(13);
//        intBuffer.put(14);
        for (int i = 0; i < intBuffer.capacity(); i++) {
            intBuffer.put(i * 2);
        }
        // 如何从Buffer读取数据
        // 将Buffer转换,读写切换
        intBuffer.flip();
        while (intBuffer.hasRemaining()) {
            System.out.println(intBuffer.get());
        }
    }

}
主要注意:flip()进行翻转,读写模式切换;
NIO 和 BIO的比较
- BIO以流的方式处理数据,而NIO以块的方式处理数据。块I/O的效率比流I/O高很多;
- BIO是阻塞的,NIO是非阻塞的;
- BIO基于字节流和字符流进行操作,而NIO基于Channel(通道)和Buffer(缓冲区)进行操作,数据总是从通道读取到缓冲区中,或者从缓冲区写入到通道中。Selector(选择器)用于监听多个通道的事件(比如:连接请求,数据到达等),因此使用单个线程就可以监听多个客户端通道;
NIO 三大核心组件关系
NIO的Selector、Channel、Buffer的关系:
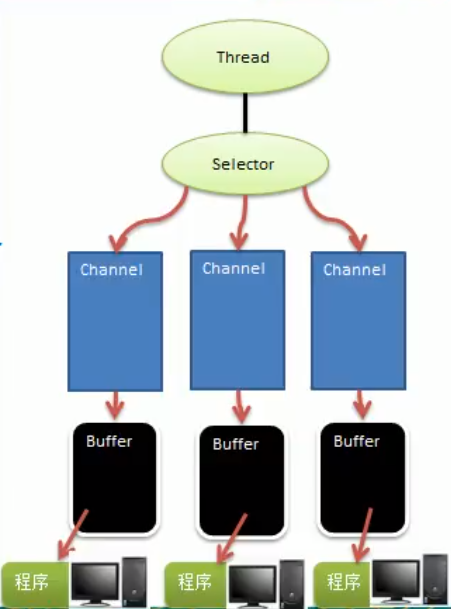
- 每个Channel都会对应一个Buffer;
- 一个Selector对应一个线程,一个线程对应多个Channel(连接);
- 该图反应了有三个Channel注册到该Selector;
- 程序切换到哪个Channel是由事件决定的,Event是一个很重要的概念;
- Selector会根据不同的事件,在各个通道上切换;
- Buffer 就是一个内存块,底层是一个数组
- 数据的读取/写入都是通过Buffer,这个和BIO不同,BIO中要么是输入流或者是输出流,不能双向流动,但是NIO的Buffer可读可写,需要用flip()方法切换;
- Channel是双向的,可以反映底层操作系统的情况,比如Linux底层的操作系统通道就是双向的;
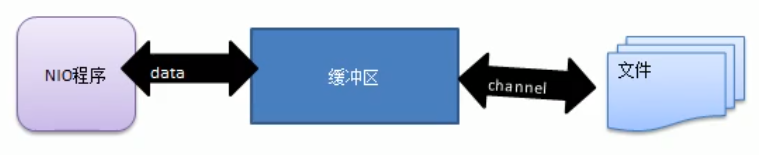
缓冲区(Buffer)
基本介绍:
-
缓冲区(Buffer):缓冲区本质上是一个可以读写数据的内存块,可以理解是一个容器对象(含数组),该对象提供了一组方法,可以更加轻松地使用内存块;
-
缓冲区对象内置了一些机制,能够跟踪和记录缓冲区的状态变化情况;
-
Channel提供从文件、网络读取数据的渠道,但是读取或写入的数据都必须经由Buffer:
Buffer类及其子类
在NIO中,Buffer是一个顶级父类,是一个抽象类,类的层级关系图:

常用Buffer子类一览:
- ByteBuffer:存储字节数据到缓冲区
- ShortBuffer:存储字符串数据到缓冲区
- CharBuffer:存储字符数据到缓冲区
- IntBuffer:存储整数数据到缓冲区
- LongBuffer:存储长整型数据到缓冲区
- DoubleBuffer:存储小数到缓冲区
- FloatBuffer:存储小数到缓冲区
Buffer类数据元素信息
Buffer类定义了所有的缓冲区都具有四个属性来提供关于其所包含的数据元素信息:
- private int mark = -1;
- private int position = 0;
- private int limit;
- private int capacity;
| 属性 | 描述 |
|---|---|
| Capacity | 容量,即可以容纳的最大数据量,在缓冲区创建时被设定并且不能改变; |
| Limit | 表示缓冲区的当前终点,不能对缓冲区超过极限的位置进行读写操作。且极限是可以被修改的; |
| Position | 位置,下一个要被读或者写的元素的索引,每次读写缓冲区的数据都会改变值,为下次读写做准备; |
| Mark | 标记 |
重点关注flip()方法:
public final Buffer flip() {
    limit = position;
    position = 0;
    mark = -1;
    return this;
}
比如一直写入数据,要读的时候,调用flip,那么就是写入多少个,读取也最多只能是多少个,因此limit=position;
Buffer类相关方法一览
public abstract class Buffer {

    // JDK1.4引入
    // 返回缓冲区的容量
    public final int capacity() {
        return capacity;
    }

    // 返回此缓冲区的位置
    public final int position() {
        return position;
    }

    // 设置此缓冲区的位置
    public final Buffer position(int newPosition) {
        if ((newPosition > limit) || (newPosition < 0))
            throw new IllegalArgumentException();
        position = newPosition;
        if (mark > position) mark = -1;
        return this;
    }

    // 返回此缓冲区的限制
    public final int limit() {
        return limit;
    }

    // 设置此缓冲区的限制
    public final Buffer limit(int newLimit) {
        if ((newLimit > capacity) || (newLimit < 0))
            throw new IllegalArgumentException();
        limit = newLimit;
        if (position > limit) position = limit;
        if (mark > limit) mark = -1;
        return this;
    }

   	// 在此缓冲区的位置设置标记
    public final Buffer mark() {
        mark = position;
        return this;
    }

    // 将此缓冲区的位置重置为以前标记的位置
    public final Buffer reset() {
        int m = mark;
        if (m < 0)
            throw new InvalidMarkException();
        position = m;
        return this;
    }

    // 清除此缓冲区,即将各个标记恢复到初始状态,但是数据并没有真正擦除
    public final Buffer clear() {
        position = 0;
        limit = capacity;
        mark = -1;
        return this;
    }

    // 反转此缓冲区
    public final Buffer flip() {
        limit = position;
        position = 0;
        mark = -1;
        return this;
    }

    // 重绕此缓冲区
    public final Buffer rewind() {
        position = 0;
        mark = -1;
        return this;
    }

    // 返回当前位置与限制之间的元素数
    public final int remaining() {
        return limit - position;
    }

    // 告知在当前位置和限制之间是否有元素
    public final boolean hasRemaining() {
        return position < limit;
    }

    // 告知此缓冲区是否为只读缓冲区
    public abstract boolean isReadOnly();

    // JDK1.6引入
    // 告知此缓冲区是否具有可访问的底层实现数组
    public abstract boolean hasArray();

    // 返回此缓冲区的底层实现数组
    public abstract Object array();

    // 返回此缓冲区底层实现数组中的第一个缓冲区元素的偏移量
    public abstract int arrayOffset();

    // 告知此缓冲区是否为直接缓冲区
    public abstract boolean isDirect();

}
ByteBuffer
从前面可以看出对于Java中的基本数据类型(除布尔类型),都有一个Buffer类型与之对应,最常用的自然是ByteBuffer类(二进制数据),该类的主要方法:
public abstract class ByteBuffer
    extends Buffer
    implements Comparable<ByteBuffer>
{

    // 缓冲区创建相关API

    // 创建直接缓冲区
    public static ByteBuffer allocateDirect(int capacity) {
        return new DirectByteBuffer(capacity);
    }

    // 设置缓冲区的初始容量
    public static ByteBuffer allocate(int capacity) {
        if (capacity < 0)
            throw new IllegalArgumentException();
        return new HeapByteBuffer(capacity, capacity);
    }

    // 构造初始化位置offset和上界length的缓冲区
    public static ByteBuffer wrap(byte[] array,
                                    int offset, int length)
    {
        try {
            return new HeapByteBuffer(array, offset, length);
        } catch (IllegalArgumentException x) {
            throw new IndexOutOfBoundsException();
        }
    }

    // 把一个数组放到缓冲区中使用
    public static ByteBuffer wrap(byte[] array) {
        return wrap(array, 0, array.length);
    }

    // 缓冲区存取相关API

    // 从当前位置position上get,get之后,position会自动-1
    public abstract byte get();

    // 从当前位置上put,put之后,position会自动+1
    public abstract ByteBuffer put(byte b);

    // 从绝对位置get
    public abstract byte get(int index);

    // 从绝对位置上put
    public abstract ByteBuffer put(int index, byte b);

}
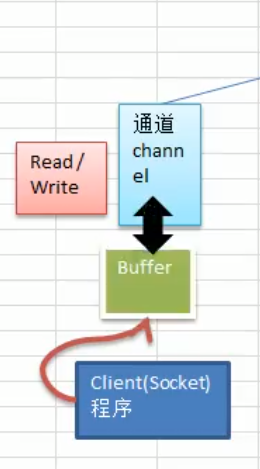
通道(Channel)
基本介绍:

-
NIO的通道类似于流,但是有如下区别
- 通道可以同时进行读写,而流只能读或者只能写
- 通道可以实现异步读写数据
- 通道可以从缓冲区读取数据,也可以写数据到缓冲区中;
-
BIO中的Stream是单向的,例如FileInputStream对象只能进行读取数据的操作,而NIO中的通道(Channel)是双向的,可以读操作,也可以写操作;
-
Channel在NIO中只是一个接口
public interface Channel extends Closeable {}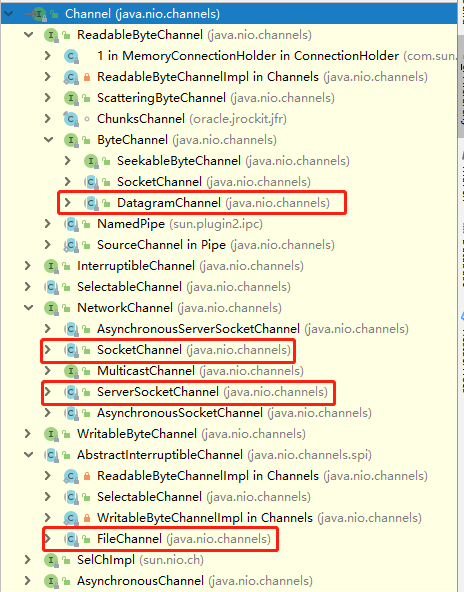
-
常用的Channel类有:FileChannel、DatagramChannel、ServerSocketChannel和SocketChannel;
- FileChannel:用于文件的数据读写;
- DatagramChannel:用于UDP的数据读写;
- ServerSocketChannel和SocketChannel用于TCP的数据读写;
FileChannel类
FileChannel主要用来对本地文件进行IO操作,常见的方法:
- public int read(ByteBuffer dst),从通道读取数据并放入到缓冲区中;
- pulbic int write(ByteBuffer src),把缓冲区的数据写入到通道中;
- public long transferFrom(ReadableByteChannel src,long position, long count),从目标通道中复制数据到当前通道;
- public long transferTo(long position,long count,WritableByteChannel target),把数据从当前通道复制给目标通道;
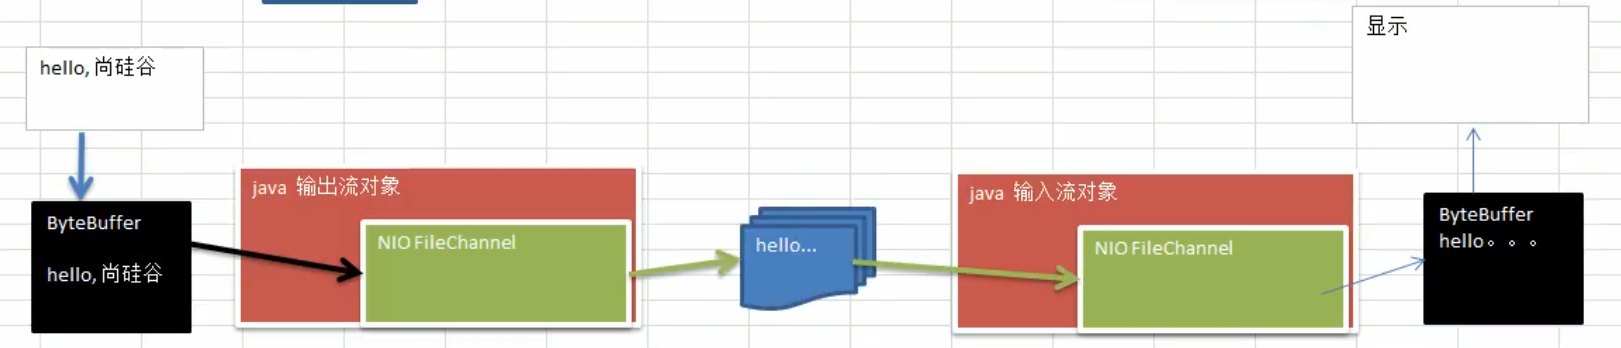
应用实例1-本地文件写数据
实例要求:
- 使用ByteBuffer(缓冲)和FileChannel(通道),将"hello tomxwd"写入到file01.txt中;
- 文件不存在则创建
代码:
public class NIOFileChannel01 {

    public static void main(String[] args) throws IOException {
        String str = "hello,tomxwd";
        // 创建一个输出流  -> Channel
        FileOutputStream fileOutputStream = new FileOutputStream("g:\\file01.txt");
        // 通过fileOutputStream 获取对应的FileChannel(真实类型是FileChannelImpl)
        FileChannel fileChannel = fileOutputStream.getChannel();
        // 创建一个缓冲区 ByteBuffer
        ByteBuffer byteBuffer = ByteBuffer.allocate(1024);
        // 将str放入到ByteBuffer
        byteBuffer.put(str.getBytes());
        // 对ByteBuffer进行翻转
        byteBuffer.flip();
        // 写入到FileChannel中
        fileChannel.write(byteBuffer);
        // 关闭流
        fileOutputStream.close();
    }

}
应用实例2-本地文件读数据
实例要求:
- 使用ByteBuffer和FileChannel,将file01.txt中的数据读入到程序,打印到控制台;
- 假定文件已存在;
代码:
public class NIOFileChannel02 {

    public static void main(String[] args) throws IOException {
        File file = new File("g:\\file01.txt");
        FileInputStream fileInputStream = new FileInputStream(file);
        FileChannel channel = fileInputStream.getChannel();
        ByteBuffer byteBuffer = ByteBuffer.allocate((int)file.length());
        channel.read(byteBuffer);
        // 将字节数据转换为字符串
        System.out.println(new String(byteBuffer.array()));
        channel.close();
        fileInputStream.close();
    }

}
应用实例3-使用一个Buffer完成文件读取
实例要求:
- 使用FileChannel和方法read,write,完成文件的拷贝;
- 拷贝一个文件1.txt,放在项目下;
代码:
public class NIOFileChannel03 {
    public static void main(String[] args) throws Exception {
        FileInputStream fileInputStream = new FileInputStream("src/main/1.txt");
        FileChannel channel01 = fileInputStream.getChannel();
        FileOutputStream fileOutputStream = new FileOutputStream("src/main/2.txt");
        FileChannel channel02 = fileOutputStream.getChannel();
        ByteBuffer byteBuffer = ByteBuffer.allocate(512);
        while (true){
            // 在这里要对Buffer进行clear【清空Buffer,重置属性】
            byteBuffer.clear();
            int read = channel01.read(byteBuffer);
            if(read==-1){
                // 读取结束
                break;
            }
            // 翻转后再写入
            byteBuffer.flip();
            channel02.write(byteBuffer);
        }
        channel01.close();
        channel02.close();
        fileInputStream.close();
        fileOutputStream.close();
    }
}
应用实例4-拷贝文件transferFrom方法
实例要求:
- 使用FileChannel和方法transferFrom,完成文件拷贝;
- 拷贝到项目下;
代码:
public class NIOFileChannel04 {
    public static void main(String[] args) throws IOException {
        File file1 = new File("g:\\file01.txt");
        File file2 = new File("g:\\file02.txt");
        FileInputStream fileInputStream = new FileInputStream(file1);
        FileOutputStream fileOutputStream = new FileOutputStream(file2);
        FileChannel source = fileInputStream.getChannel();
        FileChannel dest = fileOutputStream.getChannel();
        // 使用transferFrom完成拷贝
        dest.transferFrom(source,0,source.size());
        source.close();
        dest.close();
        fileInputStream.close();
        fileOutputStream.close();
    }
}
关于Buffer和Channel的注意事项和细节
-
ByteBuffer支持类型化的put和get,put进去是什么数据类型,get就要使用对应的数据类型取出,否则可能会报BufferUnderflowEexception异常;
public class NIOByteBufferPutGet { public static void main(String[] args) { ByteBuffer byteBuffer = ByteBuffer.allocate(64); byteBuffer.putInt(100); byteBuffer.putLong(9L); byteBuffer.putChar('啊'); byteBuffer.putShort(((short) 4)); // 取出 byteBuffer.flip(); System.out.println(byteBuffer.getLong()); System.out.println(byteBuffer.getInt()); System.out.println(byteBuffer.getChar()); // short用long来取 System.out.println(byteBuffer.getLong()); } }可以看到,如果取的类型不对,会造成数据溢出,有时会抛出BufferUnderflowEexception异常;
-
可以将一个普通的Buffer转成只读Buffer,写入的话会报ReadOnlyBufferException;
public class ReadOnlyBuffer { public static void main(String[] args) { ByteBuffer buffer = ByteBuffer.allocate(64); for (int i = 0; i < 64; i++) { buffer.put((byte) i); } buffer.flip(); // 得到一个只读的Buffer ByteBuffer readOnlyBuffer = buffer.asReadOnlyBuffer(); System.out.println(readOnlyBuffer.getClass()); // 读取 while (readOnlyBuffer.hasRemaining()){ System.out.println("readOnlyBuffer = " + readOnlyBuffer.get()); } // ReadOnlyBufferException readOnlyBuffer.put((byte)100); } } -
NIO还提供了MappedByteBuffer,可以让文件直接在内存(堆外内存)中进行修改,操作系统不需要拷贝一次,而如何同步到文件则由NIO完成;
public class MappedByteBufferTest { public static void main(String[] args) throws IOException { RandomAccessFile rw = new RandomAccessFile("src/main/1.txt", "rw"); // 获取对应的文件通道 FileChannel channel = rw.getChannel(); /** * 参数1:FileChannle.MapMode.READ_WRITE使用读写模式 * 参数2:0 可以直接修改的起始位置 * 参数3: 5 映射到内存的大小,即将1.txt的多少个字节映射到内存 * 可以直接修改的范围就是[0-5),并不包括 5,5的意思是从0开始数5个 * 实际类型是DirectByteBuffer */ MappedByteBuffer mappedByteBuffer = channel.map(FileChannel.MapMode.READ_WRITE, 0, 5); mappedByteBuffer.put(0, (byte) 'U'); mappedByteBuffer.put(3, (byte) 'U'); rw.close(); } } -
NIO还支持通过多个Buffer(即Buffer数组)完成读写操作,即Scattering和Gathering;
- Scattering:将数据写入到Buffer时,可以采用Buffer数组依次写入【分散】
- Gathering:从Buffer中读取数据的时候,可以采用Buffer数组依次读写【聚合】
public class NIOScatteringAndGathering {
    public static void main(String[] args) throws IOException {
        // 使用ServerSocketChannel和SocketChannel
        ServerSocketChannel open = ServerSocketChannel.open();
        // 创建端口
        InetSocketAddress inetSocketAddress = new InetSocketAddress(7000);
        // 绑定端口到Socket并启动
        open.socket().bind(inetSocketAddress);
        // 创建Buffer数组
        ByteBuffer[] byteBuffers = new ByteBuffer[2];
        byteBuffers[0] = ByteBuffer.allocate(5);
        byteBuffers[1] = ByteBuffer.allocate(3);
        // 等待客户端连接(telnet)
        SocketChannel socketChannel = open.accept();
        // 最多接收8个字节
        int messageLength = 8;
        // 循环读取
        while (true) {
            int byteRead = 0;
            while (byteRead < messageLength) {
                long r = socketChannel.read(byteBuffers);
                // 累计读取的字节数
                byteRead += r;
                System.out.println("byteRead = " + byteRead);
                // 使用流打印,看看当前的buffer的position和limit
                Arrays.asList(byteBuffers).stream().map(byteBuffer ->
                        "position = " + byteBuffer.position() + ",limit = " + byteBuffer.limit()
                ).forEach(System.out::println);
            }
            // 将所有的buffer进行翻转flip
            Arrays.asList(byteBuffers).forEach(byteBuffer -> byteBuffer.flip());
            // 将数据读出显示到客户端
            long byteWrite = 0;
            while (byteWrite < messageLength) {
                long w = socketChannel.write(byteBuffers);
                byteWrite += w;
            }
            // 将所有buffer进行clear复位
            Arrays.asList(byteBuffers).forEach(byteBuffer -> byteBuffer.clear());
            System.out.println("byteRead = " + byteRead + ", byteWrite = " + byteWrite + ",messageLength = " + messageLength);
        }
    }
}
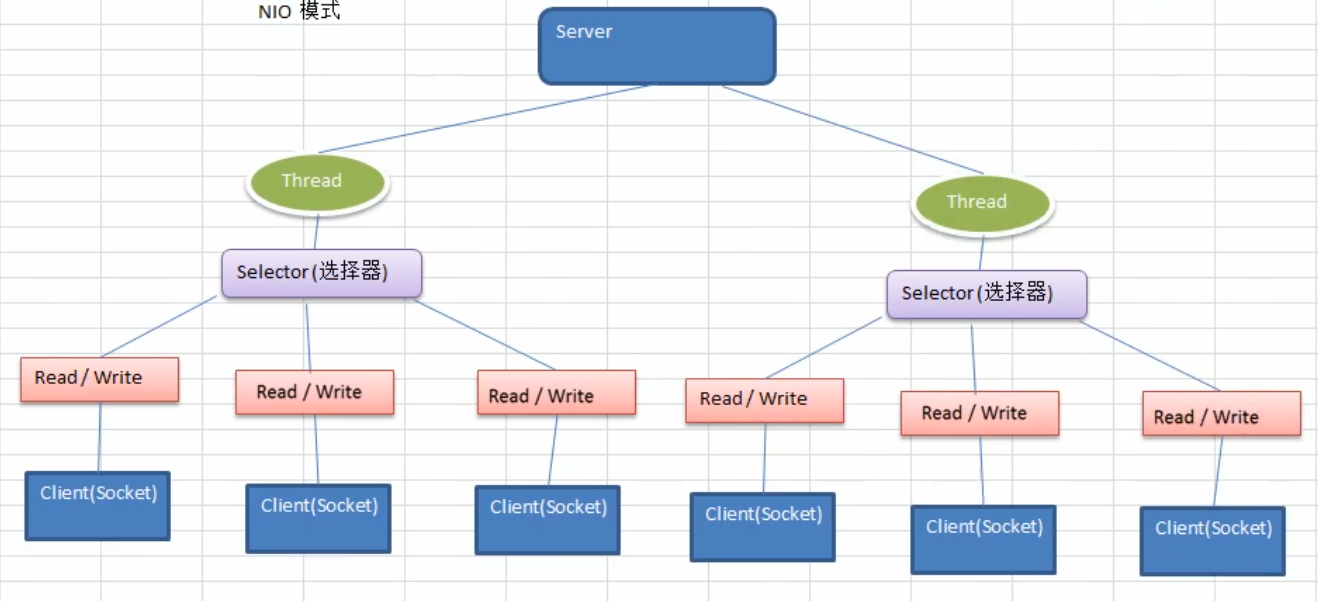
Selector(选择器)
基本介绍:
- Java的NIO,用非阻塞的IO方式。可以用一个线程,处理多个客户端连接,就会使用到Selector(选择器);
- Selector能够检测多个注册的通道上是否有事件发生(注意:多个Channel以事件的方式注册到同一个Selector),如果有事件发生,便获取事件然后针对每个事件进行相应的处理。这样就可以一个单线程去管理多个通道,也就是管理多个连接和请求;
- 只有在连接/通道真正有读写事件发生的时候,才会进行读写,大大减少了系统开销,并且不必为每个连接都创建一个线程,不用去维护多个线程。
- 避免了多线程之间的上下文切换导致的开销;
特点:
- Netty的IO线程NioEventLoop聚合了Selector(选择器,也叫多路复用器),可以同时并发处理成百上千个客户端连接;
- 当线程从某客户端Socket通道进行读写数据的时候,若没有数据可用时,该线程可以进行其他任务;
- 线程通常将非阻塞IO的空闲时间用于其他通道上执行IO操作,所以单独的线程可以管理多个输入和输出通道;
- 由于读写操作都是非阻塞的,这就可以充分提升IO线程的运行效率,避免由于频繁I/O阻塞导致的线程挂起;
- 一个I/O线程可以并发处理N个客户端连接和读写操作,这从根本上解决了传统同步阻塞I/O一连接一线程模型,架构的性能、弹性伸缩能力和可靠性都得到了极大的提升。
Selector类相关方法
Selector类是一个抽象类
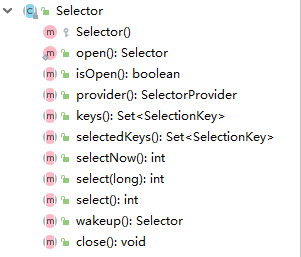
- public static Selector open():得到一个选择器对象
- public int select(long timeout):监控所有注册的通道,当其中有IO操作可以进行的时候,将对应的SelectorKey加入到内部集合中并返回,参数用来设置超时时间
- 如果调用的是不带参数的select方法,是阻塞的,直到至少获取到一个事件;
- 指定了超时时间,则就算没有监听到任何事件发生,也会返回;
- public int selectNow():如果当前没有得到任何事件,就返回;
- public Set<SelectionKey> selectedKeys():从内部集合中得到所有的SelectionKey;
注意事项:
- NIO中的ServerSocketChannel功能类似ServerSocket,SocketChannel功能类似Socket;
- selector相关方法说明:
- selector.select():阻塞
- selector.select(1000):阻塞1000毫秒,在1000毫秒后返回
- selector.wakeup():唤醒selector,比如正在处于select(1000)等待中,调用wakeup则立马返回;
- selectro.selectNow():不阻塞,立马返还
NIO非阻塞网络编程原理分析图
NIO非阻塞网络编程相关(Selector、SelectionKey、ServerSocketChannel和SocketChannel)关系梳理图:
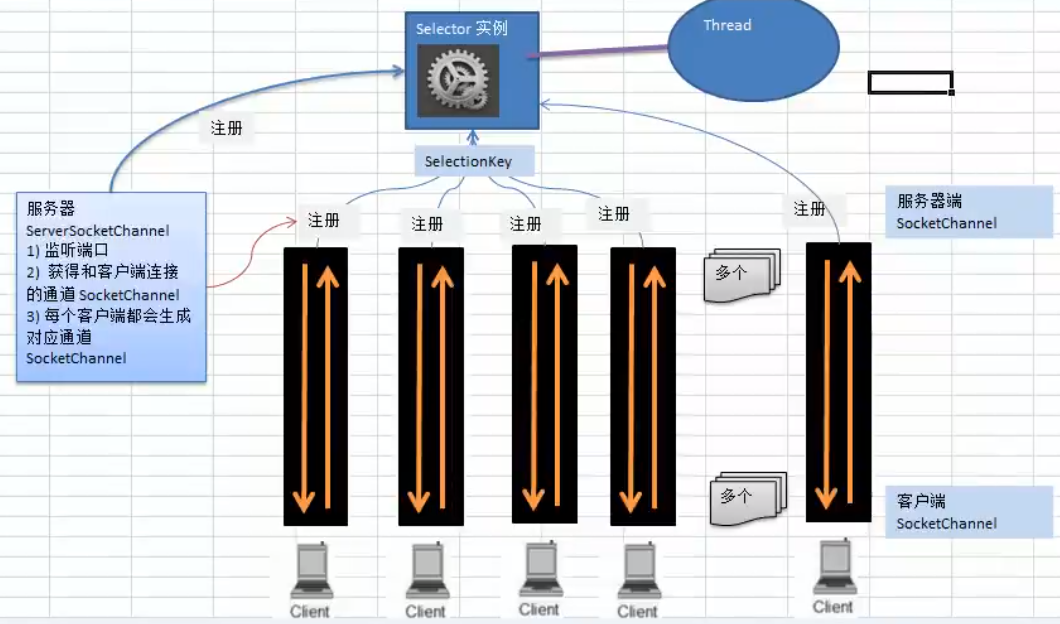
说明:
- 当客户端连接时,会通过ServerSocketChannel得到对应的SocketChannel;
- Selector进行监听select方法,返回有事件发生的通道的个数;
- 将SocketChannel注册到Selector上【register(Selector sel,int ops)】;
- 一个Selector上可以注册多个SocketChannel
- 注册后返回SelectionKey,会和该Selector关联(集合Set);
- 进一步得到各个SelectionKey(有事件发生的)
- 再通过SelectionKey可以反向获取SocketChannel,channel()方法获取;
- 可以通过得到的Channel完成业务处理;
NIO非阻塞网络编程示例代码
案例要求:
- 编写一个NIO入门案例,实现服务器端和客户端之间的简单通讯(非阻塞)
- 目的:理解NIO非阻塞网络编程机制
服务器端代码:
public class NIOServer {

    public static void main(String[] args) throws IOException {
        // 创建ServerSocketChannel  -> ServerSocket
        ServerSocketChannel serverSocketChannel = ServerSocketChannel.open();
        // 得到一个Selector对象
        Selector selector = Selector.open();
        // 绑定端口6666,在服务器端监听
        serverSocketChannel.socket().bind(new InetSocketAddress(6666));
        // 设置为非阻塞
        serverSocketChannel.configureBlocking(false);
        // 把ServerSocketChannel注册到Selector,关心的事件是OP_ACCEPT
        serverSocketChannel.register(selector, SelectionKey.OP_ACCEPT);
        // 循环等待客户端连接
        while (true) {
            // 这里等待一秒,如果没有事件发生就返回
            if (selector.select(1000) == 0) {
                // 没有事件发生
                System.out.println("服务器等待了一秒,无连接");
                continue;
            }
            // 如果返回>0,就获取到相关的SelectionKey集合
            // 1. 如果返回的>0,表示已经获取到关注的事件
            // 2. 通过selectedKeys() 返回关注事件的集合
            // 通过selectionKeys反向获取通道
            Set<SelectionKey> selectionKeys = selector.selectedKeys();
            // 遍历Set<SelectionKey>集合,使用迭代器遍历
            Iterator<SelectionKey> keyIterator = selectionKeys.iterator();
            while (keyIterator.hasNext()) {
                // 获取到SelectionKey
                SelectionKey key = keyIterator.next();
                // 根据key对应的通道发生的事件做相应的处理
                if (key.isAcceptable()) {
                    // 如果是OP_ACCEPT事件,有新的客户端连接
                    // 给该客户端生成SocketChannel
                    SocketChannel socketChannel = serverSocketChannel.accept();
                    socketChannel.configureBlocking(false);
                    System.out.println("客户端连接成功,生成了一个SocketChannel" + socketChannel.hashCode());
                    // 将当前的socketChannel注册到Selector上,关注事件为OP_READ,同时给SocketChannel关联一个Buffer
                    socketChannel.register(selector, SelectionKey.OP_READ, ByteBuffer.allocate(1024));
                }
                if (key.isReadable()) {
                    // 如果是OP_READ事件
                    // 通过key反向获取到对应的channel
                    SocketChannel channel = (SocketChannel) key.channel();
                    // 获取到该channel关联的Buffer
                    ByteBuffer buffer = (ByteBuffer) key.attachment();
                    channel.read(buffer);
                    System.out.println("from 客户端 : " + new String(buffer.array()));
                    buffer.clear();
                }
                // 手动从集合中删除当前的selectKey,防止重复操作
                keyIterator.remove();
            }

        }
    }

}
客户端代码:
public class NIOClient {

    public static void main(String[] args) throws IOException {
        // 得到一个网络通道
        SocketChannel socketChannel = SocketChannel.open();
        // 设置非阻塞模式
        socketChannel.configureBlocking(false);
        // 提供服务器端的ip和端口信息
        InetSocketAddress inetSocketAddress = new InetSocketAddress("127.0.0.1", 6666);
        // 连接服务器
        if (!socketChannel.connect(inetSocketAddress)) {
            // 连接失败
            while (!socketChannel.finishConnect()) {
                System.out.println("因为连接需要时间,客户端不会阻塞,可以做其他工作...");
            }
        }
        // 连接成功,发送数据
        String s = "hello,tomxwd~";
        // 包裹一个字节数组到Buffer中
        ByteBuffer buffer = ByteBuffer.wrap(s.getBytes());
        // 发送数据,将buffer数据写入channel
        socketChannel.write(buffer);
        System.in.read();
    }

}
SelectionKey
- SelectionKey,表示Selector和网络通道的注册关系,共四种:
- public static final int OP_ACCEPT:有新的网络连接可以accept,值为16【1<<4】
- public static final int OP_CONNECT:代表连接已经建立,值为8【1<<3】
- public static final int OP_WRITE:代表写操作,值为4【1<<2】
- public static final int OP_READ:代表读操作,值为1【1<<0】
- SelectionKey相关方法:
- public abstract Selector selector():得到与之关联的Selector对象
- public abstract SelectableChannel channel():得到与之关联的通道
- public final Object attachment():得到与之关联的共享数据,如Buffer
- public abstract SelectionKey interestOps(int ops):设置或改变监听事件
- pubilc final boolean isAcceptable():是否可以accept
- public final boolean isReadable():是否可以读
- public final boolean isWritable():是否可以写
ServerSocketChannel
- ServerSocketChannel在服务器监听新的客户端Socket连接;
- ServerSocketChannel相关方法:
- pulbic static ServerSocketChannel open():得到一个ServerSocketChannel通道对象;
- public final ServerSocketChannel bind(SocketAddress local):设置服务器端端口号;
- public final SelectableChannel configureBlocking(boolean block):设置阻塞或非阻塞模式,取值false标识采用非阻塞模式;
- public SocketChannel accept():接受一个连接,返回代表这个连接的通道对象;
- public final SelectionKey register(Selector sel,int ops):注册一个选择器并设置监听事件;
SocketChannel
- SocketChannel,网络IO通道,具体负责进行读写操作。NIO把缓冲区的数据写入通道,或者把通道里的数据读到缓冲区;
- SocketChannel相关方法:
- public static SocketChannel open():得到一个SocketChannel通道;
- public final SelectableChannel configureBlocking(boolean block):设置阻塞或非阻塞模式,取值false表示采用非阻塞模式;
- public boolean connect(SocketAddress remote):连接服务器;
- public boolean finishConnect():如果connect方法连接失败,接下来就要通过该方法完成连接操作;
- public int write(ByteBuffer src):往通道里写入数据;
- public int read(ByteBuffer dst):从通道里读取数据;
- public final SelectionKey register(Selector sel,int ops,Object att):注册一个选择器并设置监听事件,最后一个参数可以设置共享数据;
- public final void close():关闭通道;
评论区